The content types are reusable collection of site columns which can have behavior (Information management policies, events, workflows), forms, document templates. It represents an item in SharePoint list or library giving a special meaning to it. They enable organizations to maintain and organize the content in consistent manner throughout their system.
The content types are of three types. viz. Site content type, list content type and enterprise content types.
Site Content Types
The content types created using declarative manner in element manifest are termed as site content types. They are created and stored in Site Content Type gallery present at root site of site collection.
Content types can be created in both declarative (in element manifest) as well as programmatic manner. Following are the steps to show how to create a custom content type in declarative fashion. This example add the site columns created in my other blog Basics of Site Columns to a custom content type named Book.
1. In Visual Studio 2010, open the SPCustomDevelopment project created in blog post Basics of Site Columns .
2. In Solution Explorer, right-click the Features node and then click Add Feature as shown in Figure 1.
 |
| Figure 1: Add Content Type Feature |
3. Name the feature as SPCustomDevelopment – Content Types and give appropriate description. Ensure that the feature scope is set to Site. As Site Content Type gallery in which the content type gets created is present at root web of Site collection. Hence scope of the feature creating declarative content type must be set to Site as shown in Figure 2.
 |
| Figure 2: Name the Feature |
4. Rename the Feature 1 folder to Content Types as shown in Figure 3 for better readability.
 |
| Figure 3: Rename the Feature folder |
5. In Solution Explorer, right-click the SPCustomDevelopment project, select Add, and then select New Item as shown in Figure 4. Type the name as Content Types
| Figure 4: Add an Empty Element manifest |
6. Open the Elements.xml file inside Content Types project item and then replace the file content with the following code example.
<ContentType ID="0x0100921DB927A11B42709A0C51C4A37EA816"
Name="Book"
Group="SharePoint 2010 Custom Development"
Overwrite="TRUE"
Version="0"
>
<FieldRefs>
<FieldRef ID="{fa564e0f-0c70-4ab9-b863-0177e6ddd247}" Name="Title" Required="TRUE" DisplayName="Book Name"/>
<FieldRef ID="{6F87C38C-5218-45D8-905E-877D694ECC31}" Name="Technology"/>
<FieldRef ID="{52AE411D-32FB-484C-A04F-ED6C7E41A593}" Name="Publication"/>
<FieldRef ID="{7D8A68DA-3A2D-444D-A721-1E7A6633402B}" Name="PriceOfBook"/>
<FieldRef ID="{E93762F1-6F7E-4DFC-9161-0B3B35A7BE35}" Name="BookAuthors"/>
</FieldRefs>
</ContentType>
|
7. Save the file.
8. Add the Content Types project item to Content Types feature as shown in Figure 5.
 |
| Figure 5: Associate Element manifest to Feature |
9. Click on Package folder to open Package Designer. Ensure that Content Types project item is not associated with any other feature. In addition, ensure that Site Columns feature is activated first than Content Types feature.
 |
| Figure 6: Package Designer |
10. Right click the solution name and then click Deploy as shown in Figure 7. Visual Studio 2010 will build and deploy the solution to the farm/ site collection depending upon the deployment methodology selected in Step 2.
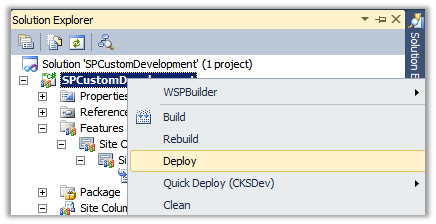 |
| Figure 7: Build and Deploy solution |
11. VS 2010 will activate both Site Columns and Content Types feature while deployment.
12. To check whether Book content type is properly created. Go to Site Settings at root site of local site collection. Then click Site Settings to open Site Settings page. Click on Site Content Types link present under Galleries section. Click on Book content type link to verify it is created correctly as shown in figure 8.
 |
| Figure 8: Book Content Type |
The Book content type is inherited from Item content type. Content type inheritance is controlled by ID attribute value. ID attribute consists of three parts as shown in below figure 9.
 |
| Figure 9: Content Type inheritance using ID property |
List Content types
When any site content type is associated to the list/ library, SharePoint behind the scenes creates a new local copy of content type inherited from site content type and then attached it with the list/library. Such new copies of content type associated with list are termed as List Content types. The content type Id of list content type is different than that of site content type.
Unlike site content types which are stored in file system (SharePoint root), list content types are stored in content database. In case site content type is changed declaratively then SharePoint does not propagate those changes to list content types. However, changes made through browser or programmatically can be pushed to list content types but to be very honest I have seen even that failing couple of occasions. So recommendation is to cross check all the child list content types once the changes are propagated.
The declarative site column propagation issues are applied to content type propagation too. Hence recommendation is to create all content types required for all phases in in one go or to use Feature Upgrade concept to add new fields to existing content types. I still remember how bad this content type propagation has haunted me in past….
Below is the code to create content types programmatically. (given as image purposefully to promote recommended declarative manner of creating content type)
 |
| Figure 10: Create content type programmatically |
Note that content type Id attribute generation logic remains same as that of declarative way.
Enterprise level content types
SharePoint 2010 now supports the enterprise level content types which are created in a special site collection called as Content Type Hub. This content type syndication allows consistency of content type schema over multiple site collection through Managed Metadata Service application. The enterprise content types can be either declaratively or programmatically in Content Type Hub. Then they can be published/ unpublished/ republished to the other site collections.
Following is the criteria for deciding where you want to create content type:
- If you want a Content Type to be available to a specific site (and its sub sites), define it in the site Content Type Gallery.
- If you want a Content Type to be available to all sites in a Site Collection, define it in the Site Collection Content Type Gallery.
- If you want to create a Content Type to be used across your entire farm or across multiple Site Collections (at the enterprise level), define a Site Collection to be a “Content Type hub.” The Content Type created in the hub can then be associated with each Site Collection using the Managed Metadata service. Once an enterprise Content Type is published, it can’t be changed within the local Site Collection.
Attach Event Receiver to content type
The event receiver can be attached to content type in the content type element as shown below.
<XmlDocument NamespaceURI="http://schemas.microsoft.com/sharepoint/events"> <Receivers xmlns:spe="http://schemas.microsoft.com/sharepoint/events"> <Receiver> <Name>ItemAdding</Name> <Type>ItemAdding</Type> <SequenceNumber>10000</SequenceNumber> <Assembly>$SharePoint.Project.AssemblyFullName$</Assembly> <Class>$SharePoint.Type.eb7f7632-da7a-4f4e-83cc-d1effc4a627e.FullName$</Class> <Data></Data> <Filter></Filter> </Receiver> </Receivers> </XmlDocument>
|
Note: Above sample make use of Replaceable Tokens in Visual Studio 2010. You can find all such tokens at http://msdn.microsoft.com/en-us/library/ee231545%28VS.100%29.aspx.
Associate Custom Forms with content type
The content type can be associated with custom list forms (application pages) using FormUrls as shown below.
<XmlDocuments> <XmlDocument NamespaceURI="http://schemas.microsoft.com/sharepoint/v3/contenttype/forms/url"> <FormUrls xmlns="http://schemas.microsoft.com/sharepoint/v3/contenttype/forms/url"> <Display>_layouts/SPCustomDevelopment/BookForms/DisplayForm.aspx</Display> <Edit>_layouts/SPCustomDevelopment/BookForms/EditForm.aspx</Edit> <New>_layouts/SPCustomDevelopment/BookForms/NewForm.aspx</New> </FormUrls> </XmlDocument> </XmlDocuments> |
If you have created the list forms directly in List/ Library using SharePoint Designer or as Modules, you can use them as shown below.
<XmlDocuments> <XmlDocument NamespaceURI="http://schemas.microsoft.com/sharepoint/v3/contenttype/forms/url"> <FormUrls xmlns="http://schemas.microsoft.com/sharepoint/v3/contenttype/forms/url"> <Display>~list/Item/CustDisplayForm.aspx</Display> <Edit>~list/Item/CustEditForm.aspx</Edit> <New>~list/Item/CustNewForm.aspx</New> </FormUrls> </XmlDocument> </XmlDocuments> |
You can also create custom form templates (.ascx) and then associate them with content type using FormTemplates as shown below.
<XmlDocuments> <XmlDocument NamespaceURI="http://schemas.microsoft.com/sharepoint/v3/contenttype/forms"> <FormTemplates xmlns="http://schemas.microsoft.com/sharepoint/v3/contenttype/forms"> <Display>BookCustomDispForm</Display> <Edit>BookCustomEditForm</Edit> <New>BookCustomNewForm</New> </FormTemplates> </XmlDocument> </XmlDocuments>
|
By default, SharePoint uses ListForm form template present in SharePointRoot\Template\ControlTemplates\DefaultTemplates.ascx as custom form template for most of the OOB content types.
Associating workflow to content type
Workflows can be associated with the content types using AssociationCategories tag in Workflow element in element manifest file as shown below.
<Workflow Name="Book Approval Workflow" Description="This workflow is used to approve the book to be published." Id="d827937e-0911-4230-bd8f-e1b97a8277a6" CodeBesideClass="SPCustomDevelopment.BookApprovalWorkflow.BookApprovalWorkflow" CodeBesideAssembly="$assemblyname$"> <Categories/> <MetaData> <AssociationCategories>ContentType;0x0100921DB927A11B42709A0C51C4A37EA816</AssociationCategories> <StatusPageUrl>_layouts/WrkStat.aspx</StatusPageUrl> </MetaData> </Workflow>
|
Workflows can be associated with multiple content types by using ;# as separator as shown below.
<Workflow Name="Book Approval Workflow" Description="This workflow is used to approve the book to be published." Id="d827937e-0911-4230-bd8f-e1b97a8277a6" CodeBesideClass="SPCustomDevelopment.BookApprovalWorkflow.BookApprovalWorkflow" CodeBesideAssembly="$assemblyname$"> <Categories/> <MetaData> <AssociationCategories>ContentType;0x0100921DB927A11B42709A0C51C4A37EA816;#ContentType;0x0100DCF5DCB7D735430EB17812839250E585</AssociationCategories> <StatusPageUrl>_layouts/WrkStat.aspx</StatusPageUrl> </MetaData> </Workflow>
|
If just ContentType is mentioned as a value of AssociationCategories tag then workflow gets attached with all the content types.
Now finally, if you know the cure of Absent mindedness, I am in desperate need your consultation.
No comments:
Post a Comment